title: “VictoriaMetrics”
date: 2023-06-01T14:30:08
slug: victoriametrics
What makes VictoriaMetrics the next leading choice for open-source monitoring


Amit Karni
·
Follow
Published in
Everything Full Stack
·
6 min read
·
May 10, 2022
727
2

During the last years, the de-facto standard choice for open-source monitoring has been the Prometheus-stack combined with Grafana, Alermanager, and various types of exporters.
At the time, it was a pretty decent stack.
Today, though, in a fast-growing ecosystem, it has problems:
Recently, I was asked to review, design and deploy a monitoring solution to switch/extend the current Prometheus stack.
The solution should be high-performance, highly-available, cheap, redundant, scalable, backupable, and can store high data retention.
After researching a few solutions like Thanos, Cortex, Grafana-Mimir, and VictoriaMetrics.
It’s clear to say that in my opinion, VictoriaMetrics is the winnerand the best fit for my purposes & needs.
Why VictoriaMetrics?
WhileThanos,Cortex,andGrafanaMimirare designed toextendthe old Prometheus stack with HA and long-term storage capabilities.
VictoriaMetrics seems to take Prometheus Stack and break it into micro-services architecture using stronger and better new components.It has high availability built-in, as well as superior performance & data compression compared to the Prometheus stack, Scaling is very easy since every component is separate and most of the components are stateless, which means it can be designed to run on spot nodes and reduce costs.
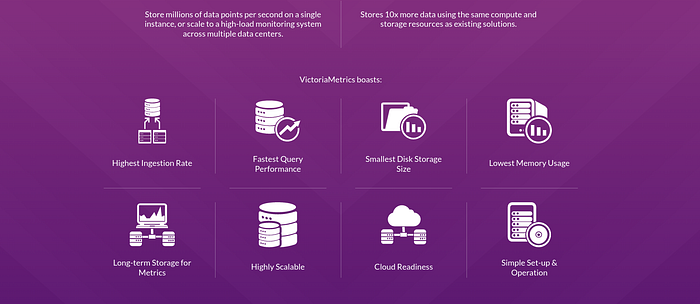
- It uses 10x less RAM than InfluxDB and up to 7x less RAM than Prometheus, Thanos or Cortex when dealing with millions of unique time series (aka high cardinality).
- It provides high data compression, so up to 70x more data points may be crammed into limited storage compared to TimescaleDB and up to 7x less storage space is required compared to Prometheus, Thanos, or Cortex.
- It is optimized for storage with high-latency IO and low IOPS (HDD and network storage in AWS, Google Cloud, Microsoft Azure, etc). See disk IO graphs from these benchmarks.
- A single-node VictoriaMetrics may substitute moderately sized clusters built with competing solutions such as Thanos, M3DB, Cortex, InfluxDB or TimescaleDB. See vertical scalability benchmarks, comparing Thanos to VictoriaMetrics cluster and Remote Write Storage Wars talk from PromCon 2019.
- It provides high performance and good vertical and horizontal scalability for both data ingestion and data querying. It outperforms InfluxDB and TimescaleDB by up to 20x.
- Easy and fast backups from instant snapshots to S3 or GCS can be done with vmbackup / vmrestore tools. See this article for more details.
- It protects the storage from data corruption on unclean shutdown (i.e. OOM, hardware reset or
kill -9) thanks to the storage architecture.
- VictoriaMetrics can be used as long-term storage for Prometheus
- VictoriaMetrics supports Prometheus querying API, so it can be used as Prometheus drop-in replacement in Grafana.
- It features easy setup and operation
- It implements PromQL-based query language — MetricsQL, which provides improved functionality on top of PromQL.
- It provides a global query view. Multiple Prometheus instances or any other data sources may ingest data into VictoriaMetrics. Later this data may be queried via a single query.
VictoriaMetrics cluster Architecture
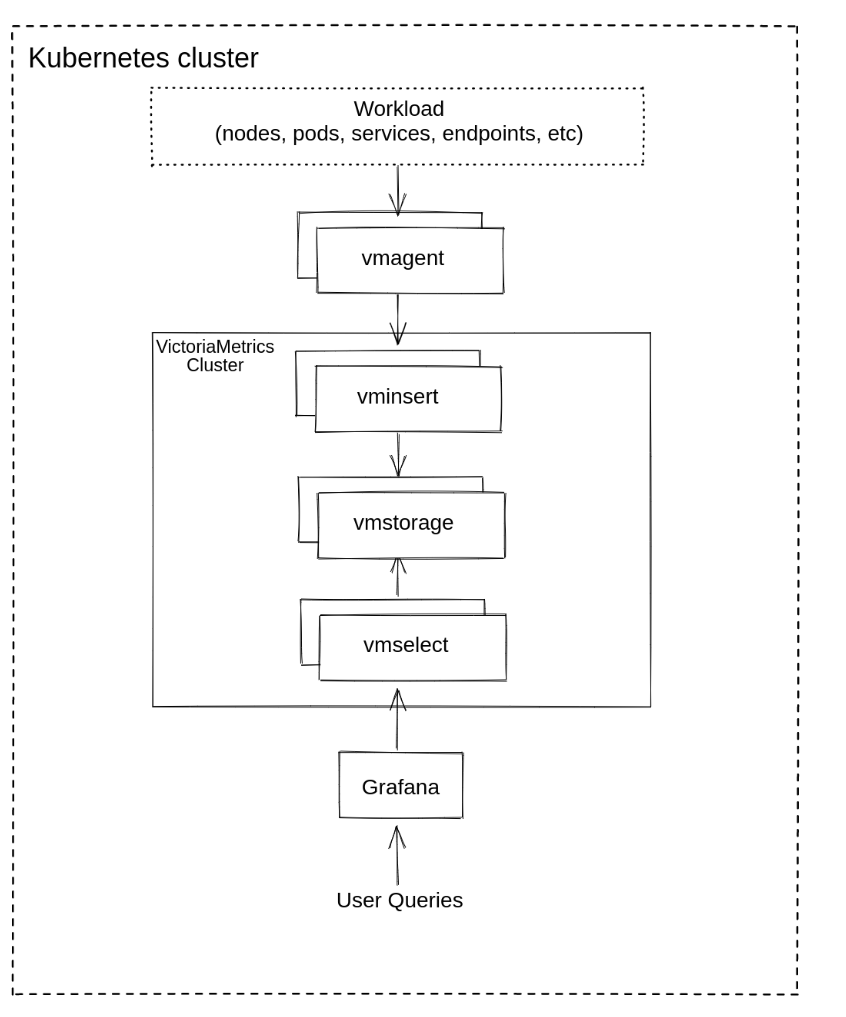
VictoriaMetrics can be deployed as a single server or as a cluster version, I chose to deploy the VictoriaMetrics-cluster on k8s. (using Helm-charts)


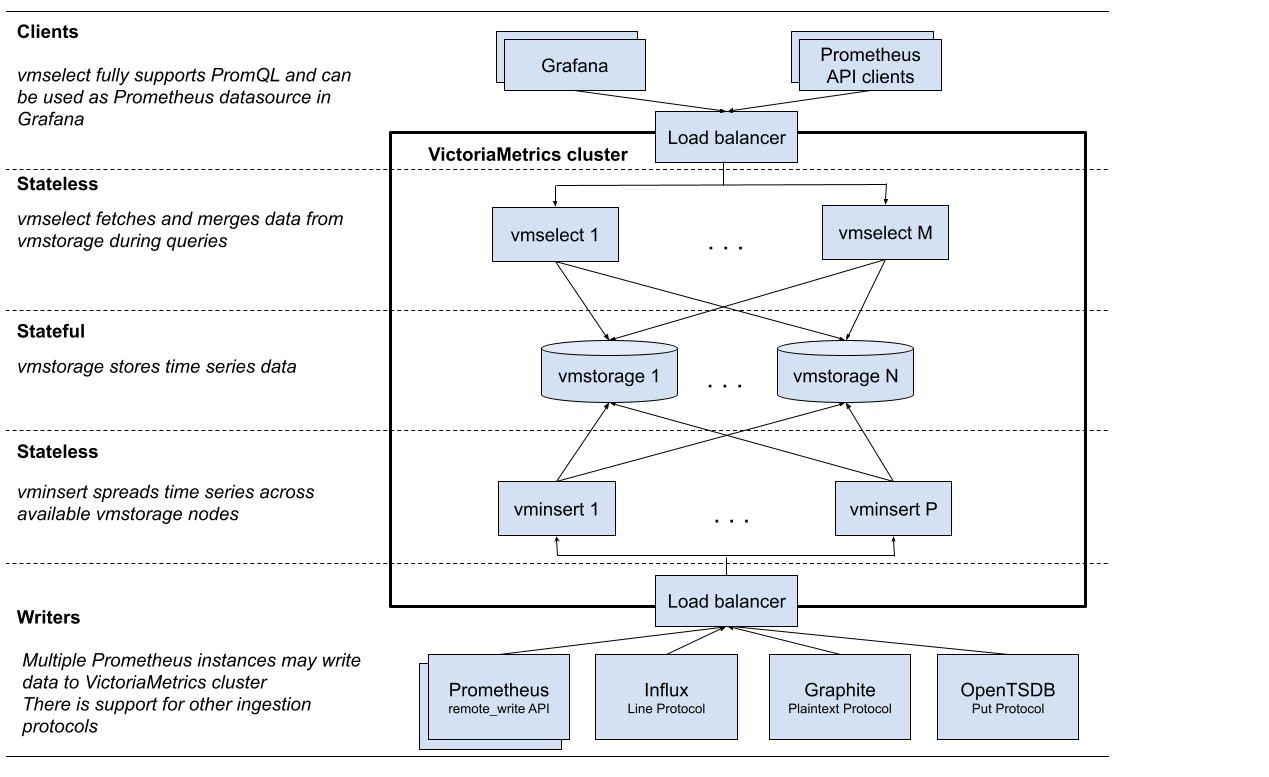
vmstorage: stores the raw data and returns the queried data on the given time range for the given label filters. This is the only stateful component in the cluster.vminsert: accepts the ingested data and spreads it among vmstorage nodes according to consistent hashing over metric name and all its labels.vmselect: performs incoming queries by fetching the needed data from all the configured vmstoragenodesvmauth: is a simple auth proxy, router for the cluster. It reads auth credentials from the Authorization HTTP header (Basic Auth, Bearer token, and InfluxDB authorization is supported), matches them against configs, and proxies incoming HTTP requests to the configured targets.vmagent: is a tiny but mighty agent which helps you collect metrics from various sources and store them in VictoriaMetrics or any other Prometheus-compatible storage systems that support the remote_write protocol.vmalert: executes a list of the given alerting or recording rules against configured data sources. Sending alerting notifications vmalert relies on configured Alertmanager. Recording rules results are persisted via remote write protocol. vmalert is heavily inspired by Prometheus implementation and aims to be compatible with its syntaxpromxy: used for querying the data from multiple clusters. It’s Prometheus proxy that makes many shards of Prometheus appear as a single API endpoint to the user.
Cluster resizing and scalability
Cluster performance and capacity can be scaled up in two ways:
- By adding more resources (CPU, RAM, disk IO, disk space, etc..) AKA vertical scalability.
- By adding more of each component to the cluster AKA horizontal scalability.
The components can all be scaled individually, the only stateful component is the vmstorage component.
Therefore, it’s easier to maintain and scale clusters.
Now, adding new components and updating vminsert configurations is all it takes to scale the storage layer. Nothing else is needed.
Built-in High Availablity
By using the clustered version of VictoriaMetrics, redundancy and auto-healing are built into each component.
Even when some cluster components are temporarily unavailable, the system can continue to accept new incoming data and process new queries.
vminsert re-routes incoming data from unavailable vmstorage nodes to healthy vmstorage nodes
Additionally, data is replicated across multiple nodes within the cluster which makes it also redundant.The cluster remains available if at least a single vmstorage node exists
Disaster Recovery best-practice
For better cluster performance, VictoriaMetrics recommends that all components run within the same subnet network (same availability zone) for high bandwidth and low latency.
To achieve DR following VictoriaMetrics best practice, we can run multiple clusters on different AZs or regions, each AZ or region has its own cluster.
*It is necessary to configure vmagentto send data to all clusters.
In the event of an entire AZ/Region going down, Route53 failover and/or Promxy failover can still be used to read and write to other online clusters in another AZ/Region.
As soon as the AZ/region is online again, vmagentwill send its cached data back into that cluster.
Backup & Restore
vmbackup creates VictoriaMetrics data backups from instant snapshots.
Supported storage systems for backups:
- GCS. Example:
gs://<bucket>/<path/to/backup>
- S3. Example:
s3://<bucket>/<path/to/backup>
- Any S3-compatible storage such as MinIO, Ceph or Swift. See these docs for details.
- Local filesystem. Example:
fs://</absolute/path/to/backup>. Note that vmbackup prevents from storing the backup into the directory pointed by -storageDataPath command-line flag, since this directory should be managed solely by VictoriaMetrics or vmstorage.
vmbackup supports incremental and full backups. Incremental backups are created automatically if the destination path already contains data from the previous backup.
Full backups can be sped up with -origin pointing to an already existing backup on the same remote storage. In this case vmbackup makes a server-side copy of the shared data between the existing backup and the new backup. It saves time and costs on data transfer.
The backup process can be interrupted at any time, It is automatically resumed from the interruption point when restarting vmbackup with the same args.
Backed-up data can be restored with vmrestore.
Summarizing
In this post, I share the features that I find most interesting, but there are many more that may be of interest to others (multitenancy, for example).
VictoriaMetrics team has done an amazing job redesigning a monitoring tool that uses the commonly used Prometheus-stack monitoring platform but builds-in changes that are appropriate & necessary using micro-services components.

VictoriaMetrics is a fast and scalable open-source time-series database and monitoring solution that lets users build a monitoring platform without scalability issues and minimal operational burden.


